Wednesday, September 28, 2016

Simple Fall Decorations


If you love to decorate for the seasons but don't always have time for elaborate displays, we have found some simple ideas that you can use.

Often a very simple display makes the most impact. This old milk can has been spray painted and filled with a dry arrangement. A sunflower and bow completes the arrangement.

You can use whatever you may have for the dry arrangement; if you live in an area where cattails grow they would be beautiful.

Use a color scheme for the painted can and bow that will work well with the outside of your home, or give it a bright pop of color.

Along the same lines is the pumpkin filled with sunflowers, leaves, and artificial cattails.

Your local craft store will have these faux pumpkins in many shapes and heights. The burlap bow has just the right touch and doesn't compete with the flower arrangement.

Either of these two arrangements placed by the front door would be wonderful seasonal displays that don't require a lot of work (or storage). If you like a little more add potted mums or more pumpkins to the display.

Or use these simple ideas to get your own creative juices flowing.
These adorable painted jars are another simple and quick decoration for fall. Find a leaf pattern you like and trace it onto contact paper. Cut out the leaves and place them onto the jars, then paint the jars in the colors you like.

Once the paint has dried peel off the contact paper leaves. Pour small pebbles or popcorn (un-popped) into the bottom of the jars and place a small votive candle inside.

Give the tops of the jars a little trim with raffia, ribbon, or whatever you have and its done!

Sunday, September 25, 2016

Kitchen Makeover Completed

The last stage of our kitchen makeover.

Once we had the cabinet doors completed we addressed the broken drawer. We needed to make it narrower so it would open instead of hitting the range.


We added a new glide area to the inside on the left side, then added a new front section. Once this was done and painted, the drawer itself had to be made narrower. It took a little effort, but it was certainly worth it.


You can see by the angle of this shot that the new drawer will open without catching on the range. The drawer fronts were trimmed with the flat screen molding and have new knobs.

On to the backsplash. Again, in order to keep a tight budget we decided to use beadboard on the backsplash. The kitchen sink was very close to the backsplash, so in that area we went with ceramic tile.

We didn't want to use a lot of tile to save cutting around difficult areas. We used a simple, white subway tile. It was very easy to do and gave a nice textural look.


We put the microwave in its spot, cleared the clutter, and used white canisters. We spent a few enjoyable hours making new topiaries to display; and new curtains were made that match the ones in the laundry room.

I found gorgeous draperies online for the dining room windows that were way, way too expensive. So I copied the style and made some that are perfect.

Since we did so well with the budget, we splurged and bought a pantry. It fits the area beautifully and the whole look is complete.


The kitchen was so wonderful after its makeover that my relative decided to get a new sink faucet. Now everything is perfect and she can enjoy it! At least until she sells it.


It was a great project and I enjoyed working on it. Tell us what you think!


Saturday, September 24, 2016

Kitchen Cabinet Makeover

We are continuing with the kitchen makeover. We had emptied the cabinets so we could paint the insides and we gave the outside of the cabinets a fresh coat of white paint, too. Once the paint had completely dried we covered the cabinets in order to paint the countertops. The countertop makeover was shown in an earlier post - Painted Kitchen Countertops.

The pictures are a little cluttered with things we have removed; but you can see what we have started with.


The range will remain with the house (we are getting it ready to sell), and this drawer with the missing front won't open more than a few inches before catching on the range. We will fix that issue by making the drawer narrower; a little storage will be lost but it will at least open.


Along this wall is the refrigerator and an unusual cabinet area that we have decided to make a baking center. Above is a cut out that will be the new location of the microwave.

The cabinets are original to the home. Plain wood with no trim or decoration at all. The backsplash is some sort of thin wallboard that has also been painted. I do like this soft sage color - but ONLY on the walls!


The back side of the bar area also has doors which are totally unnecessary. The lower cabinets can easily be accessed from the kitchen side. We are going to remove the large doors and cover the area with a single finish.

The smaller door at the end we will leave since it allows access to a corner cabinet that can't be reached from the kitchen.


The kitchen is open to the family dining area and it has a nice flow. The double windows are nice but need a simple and breezy window treatment.


The side wall has plenty of room for a stand-alone pantry and there is plenty of depth in the area so a pantry won't clog up the flow.

Again, there was not a large budget for the kitchen makeover. We decided to use beadboard and a small trim to outline it. We also decided to keep it all white and use a latex enamel for better wear.


This was the model we tried. We really liked the way it turned out and it would save a lot of money by covering only the center section of the doors with beadboard. The trim is a small, flat screen molding.

Since we liked the look of the beadboard on the cabinets -we got to work! There seemed to be a lot of cabinets once we got started; but the results were fantastic.


We found a little wooden trim piece and nailed it to the front of the sink area then painted.


We liked the beadboard so much that we decided to put it on the dining room side of the lower bar area. It covered the place where we removed the two large doors and gave the whole area a clean, cohesive look.


We didn't use beadboard on the drawer fronts since it would have been very narrow. However, we did use the screen molding to give them a fresh look, too. We found inexpensive new door/drawer knobs in a simple design to go with the new look.

We now had to decide on the backsplash. And we will save that for tomorrow and show you the completed kitchen!


Tuesday, September 20, 2016

Sparkling Baby Name Bracelet


A customer favorite baby and children's name bracelet is our Graceful Child bracelet.

This beautiful name bracelet is made with sterling silver letter blocks, cultured pearls, and sterling beads set with sparkling cz.

It comes with a 1/2 inch extension chain so the size can be let out as your child grows. When she has outgrown her bracelet, it can also be resized. Our Graceful Child name bracelet also comes with a free birthstone charm (October shown).

We have 3 letter block styles to choose from; and also 3 clasp styles. This dainty name bracelet has quickly become a favorite with our customers. Be sure to see all of our baby and children's name bracelets to find your favorite.


Saturday, September 17, 2016

Painted Kitchen Countertop


After the laundry room makeover, my cousin and I moved on to the other large project in her house -the kitchen. The kitchen had white cabinets, which was nice, but they were bland. No trim at all.

The kitchen was open to the dining room, which was also nice, and the dining room walls were a soft, sage green with white trim. I liked the color and the paint was fairly new so it didn't have to be repainted.

The big problems in the kitchen were the countertops, backsplash, and the bland cabinet doors. An attempt to update the countertops had been done; they were painted the same sage green. Ditto the backsplash! Having the walls, countertops, and backsplash all the same color made the kitchen look dated and a little cheap.

We decided to start with the countertops. I looked at all the options available. Replacing them with pre-made countertops was going to be too expensive. Obviously, stone would be really expensive, and she didn't want to use tile. That left re-painting them.

I looked at all the different types of countertop paints. Most required an artist's eye and the ability to make several layers of paint look like stone. At $150 these kits weren't really cheap, and if you didn't have the knack to make it look good then the money would be wasted.

I finally came across a product I thought had the greatest chance of success. The product is by Daich and is made to imitate a soapstone.

According to the video you can watch, you simply roll on a base coat of paint, roll on 2 layers of the rock chips, and then roll on 2 protective topcoats. No artistic design needed.

There are 6 or 7 different colors to choose from; we choose this one called "Natural White". It isn't a bright white, but a soft off-white.

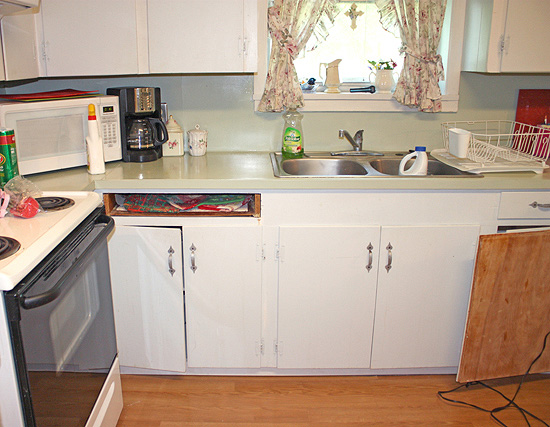
I ordered one kit from Home Depot, and was pleased that it came in two days earlier than estimated. These are the countertops we started with.


(Yes, that drawer front is missing, but that gets done another day). The first thing we had to do was sand the countertops to remove the shine. Then patch any cracks. As the surface of the countertop was the original late '60's formica, there were cracks! We filled them with spackle and then sanded it smooth when dry.

We also tapped off anything we didn't want painted and covered the sink and faucet with plastic. We planned to re-do the backsplash so it wasn't covered.


It was time to break out the kit! I was a little nervous as I had never tried this before and it cost $125 for the kit (and it wasn't my house). We rolled on the base layer of paint. It was very easy to do, a little thicker than standard paint; more like pudding. However, it rolled on easily and smoothly with no overlap lines. It also dried beautifully.

On to the stone layer. We found that having one person roll on the stone and the second person coming behind and moving the stone around with a plastic putty knife worked really well. The stone could easily be moved around so that it was spread out evenly.

It was also very easy to apply to the vertical edges of the countertop. We applied 2 coats of stone with drying time in-between. We let it dry overnight and sanded it the next day. We preferred a slight texture rather than a slick, smooth finish so the sanding didn't take a lot of time.


After applying 2 layers of topcoat, we were done! I will say that this was very easy and it looks just the way it is advertised! No special painting techniques, no special skills.

It has been 6 months since this was done and the countertops are still beautiful and look the same as the day we finished!


I am very pleased with this product and the kitchen countertops look great. Since we left a slight texture they also have the "feel" of stone. The countertops made a huge difference in the kitchen. Of course, we aren't done yet. We'll move on to the cabinets and backsplash next.

Tuesday, September 13, 2016

Princess Necklace


A brand new necklace for girls. Beautifully made in 14kt gold and rhodium. Rhodium is a precious metal in the platinum family.

The Princess necklace is perfect for any sweet little princess on your list. The 14kt gold chain is included; the chain is adjustable at 14" and 16". With our adjustable chain, her necklace will "grow up" with her.

Shop early for our beautiful children's necklace. Use our coupon (at right) for extra savings until October 31st!


Click to shop all our children's necklaces.

Saturday, September 10, 2016

Laundry Room Makeover


A relative of mine has decided to sell her home and asked if I would help her fix it up before putting it on the market. Most of the home just needed to be "de-cluttered"; however, the laundry room had never had anything done to it since the house was built.

It is a large room that must have originally served as a pantry also. There were some original shelves on the back wall (that were now sagging and were propped up), a washer and dryer that would remain, and a small chest freezer that she no longer needed. A lot of clutter, and not much else.


The front wall held the mis-matched washer and dryer. For some reason cabinets were never added to the room.


It is a large laundry room and there were many possibilities, however, the budget was tight. We decided the one thing truly needed was a least one wall cabinet above the washing machine. That would be our main expense. We also decided that because the room was large we would add a folding table to the back wall.

First thing to do was remove everything in the room. We sorted it all into groups; craft items, paint supplies, tools, etc. To add a folding table the lowest wall shelf would need to be removed; but we would reuse it somewhere else.

The walls were already a soft sage green and the trim work white. The flooring was new. So we were using those as our colors and wood tones.

We needed to organize all the things she needed to store without spending much. We purchased cardboard boxes and trimmed them with paint, bits of ribbon, and labels.


The folding table was made from plywood with a whiteboard top glued to the plywood. The legs are 2 x 4's, screwed together, and the front is a 1 x 3. The folding table is also supported underneath with 2 x 4's screwed to three walls. The table is 3 1/2 feet deep x 7 1/2 feet long. Wonderful!

We painted everything white, including the two remaining wall shelves, and we used a shelf support to stop the sagging.

An old (and broken) Jenny Lind baby bed was cut up and made into a laundry basket holder. It fit perfectly under one side of the folding table. The heavier tools are stored under the other side. A small bookshelf would have been nice, but not in the budget.


An old dresser was stored in this room and was home to some of her craft items. We taped off the top and used two cans of spray paint on the bottom to give it a fresh look. A simple valence and white curtains were made for the two windows that were on the outside wall. She also had a wonderful stained glass window that we hung between the windows.


We moved out the chest freezer and found a small white bookcase (that was cluttering the living room) and moved it to the inside wall. It provided extra storage and wasn't very deep so it fit the space well.


On to the front, and main, wall. We purchased a simple white wall cabinet from Lowes, two 1 x 12 x 6 foot boards, shelf brackets (on sale for $1.30 each), and a can of wood stain, and 2 cans of white appliance epoxy spray paint (for the harvest gold dryer).

Spray painting the dryer took a little time as we removed the top and carefully taped off anything not to be painted. The shelves were wood stained -the long shelf removed from the back wall was placed just a few inches from the top of the washer and dryer. And the new cabinet was hung at the end of the wall.


The wicker baskets and all of the decorative items in the room were found by rummaging in her closets. It helped de-clutter the closets and the pieces look fantastic in the new laundry room.

It took a bit of work to get the folding table done and patience with the dryer, but the rest of the room was fairly simple.

It is now a beautiful room with a cohesive design; it has a lot of storage space but none of the clutter.

What do you think?

Monday, September 5, 2016

Sapphire -September's Birthstone


Blue sapphire is the birthstone jewel for September. They are gemstone variety of the mineral corundum. The red variety of corundum is a ruby.

Sapphires are listed on the Mohs hardness scale at 9.0, so they are quite hard gemstones.

Sapphires are typically blue but they also come in other colors such as white, pink, purple, orange, and green. These are known as "fancy sapphires".

The most valuable color of sapphire is a cornflower blue color known as Kashmir Sapphire or Cornflower Blue Sapphire. There is also a color-changing sapphire that is blue in natural light and violet in artificial light (very much like the gemstone alexandrite).

The sapphire is the most precious blue gemstone due to its wonderful color, hardness, durability, and luster.

The Gingham Grasshopper offers birthstone jewelry for children, teens, and adults. Our newest baby and children's bracelet, Golden Sparkle, is available in all 12 birthstones.

The bracelet is crafted from 14kt gold-filled beads, sparkling cz, and Swarovski birthstone cubes.

We also offer children's name bracelets with genuine birthstones such as Timeless Baby Bracelet, an all-sterling bracelet with genuine birthstones.

Our pearl and birthstone bracelets include Birthday Glamour Bracelet, and A Little Sparkle; a beautiful engraved bracelet in pearls and genuine birthstones.

In our children's birthstone earrings you'll find a wonderful selection of solitaire birthstones in silver and 14kt gold. We have adorable birthstone 'huggie' earrings, heart-shaped birthstone earrings, and lever back birthstone earrings for older children and teens.

The Gingham Grasshopper carries a wide variety of birthstone necklaces and pendants, too. Dainty little butterfly shaped birthstone necklace for children, and beautiful solitaire-style pendants for teens; chains included!

Plus we have a large selection of birthstone rings for babies through adults. Our birthstone rings are customer favorites and they are available in sterling silver, 10kt white and yellow gold, and 14kt gold.

You'll find the perfect gift for your birthday girl, big or little, in our wonderful birthstone jewelry. And, as always, if you need any help you can call us, we will be glad to help you!